Heat shrink tubing - not magic but close
Heat shrink tubing and tape are slick products for the DIY person. Read about them here.

Heat shrink what?
Have you ever struggled with splicing wires and then trying to protect the connection with electrical tape? Yeah, me too. It isn't the neatest solution and doesn't always stay put. Also, it isn't particularly water-resistant.
Enter the wonder that is heat shrink tubing! A company by the name of Raychem invented it in 1962 to wild and joyous acclaim in every corner of the world. Okay, I don't about the worldwide reaction, but it is a slick and useful product. According to Wikipedia,
Heat-shrink tubing (or, commonly, heat shrink or heatshrink) is a shrinkable plastic tube used to insulate wires, providing abrasion resistance and environmental protection for stranded and solid wire conductors, connections, joints and terminals in electrical work. It can also be used to repair the insulation on wires or to bundle them together, to protect wires or small parts from minor abrasion, and to create cable entry seals, offering environmental sealing protection. Heat-shrink tubing is ordinarily made of polyolefin, which shrinks radially (but not longitudinally) when heated, to between one-half and one-sixth of its diameter.
Every time I use heat shrink tubing, I feel a bit of nostalgia, just in reverse. Say what? Hang on, let me explain. Heat shrink tubing doing its thing reminds me of the black snake fireworks we played with as kids, just in reverse. While the snake expands and grows under the influence of heat, the tubing shrinks.

Making it work for your projects
Tools required
- A knife to cut the insulation off the ends of the wires and to cut the tubing.
- Matches or lighter to shrink the tubing.
Step-by-step
- Strip one inch (1") of insulation from the wires if needed.
- Select a piece of tubing approximately twice the diameter of the wire and cut a piece 1 - 2" long.
- Slide the tubing onto one of the wires.
- Put the bare ends side-by-side and twist them together.
- Fold the twisted ends flat against one of the wires.
- Slide the tubing over the splice.
- Using a match or lighter, hold the flame about .25 - .5" below the tubing and move it back and forth until the tubing shrinks tightly against the spice.
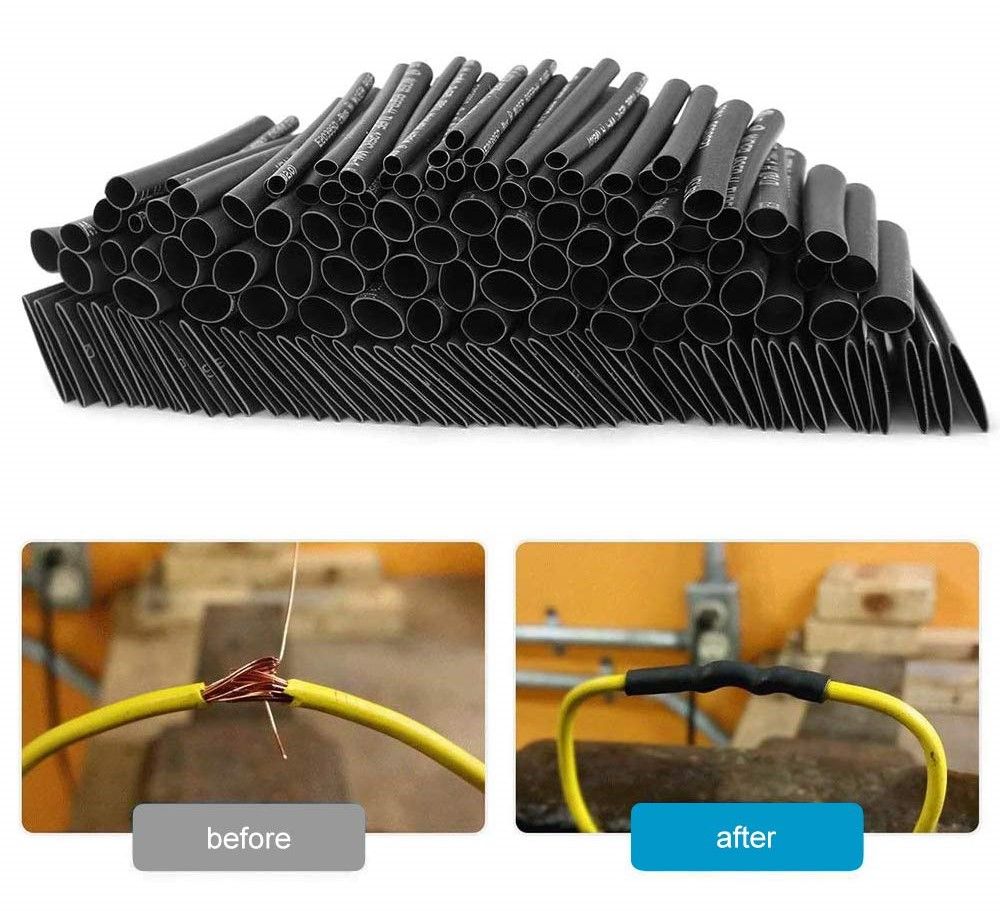
Ta-dah! You are the proud owner of a beautifully finished wire splice. Check out the image from Amazon below showing the different diameters of tubing and how it looks after heat is applied.

Questions anyone?
Q. Why yes, thank you. What do I do if the tubing doesn't shrink tightly around my splice?
A. Try heating it again. The tubing is somewhat forgiving. I've done this quite a few times and 99% of the time, it works.
Q. My tubing is smoking and flaming! What do I do?
A. Move your heat source further away. If you burn it badly, you may need to cut it away and start over.
Q. Is this a Henry Ford product meaning I can get it in any color as long as it's black?
A. Not in the least. Check out the beautiful rainbow of colors below.

Q. I forgot to put the tubing on before I splice the wires. Can I slice a piece open and use it that way?
A. I feel your pain, as I have done this lots of times. Cutting the tubing isn't something I recommend. That leaves three options:
- Take the splice apart, slip on the tubing and follow the steps above.
- Use electrical tape - ugh, last resort only.
- Use heat shrink tape. We cover that next.
Heat shrink tape

Meet heat shrink tubing's sibling, heat shrink tape. I have never used this product, but understand it works the same way as the tubing. And, I must admit, it seems to have some advantages over the tubing.
Here are some that come to mind.
- Easily wrap bundles of wires,
- Good for very large wires.
- No need to take a splice apart to slip on a piece of tubing.
- Good for sealing a wire nut connection.
- Applies like electrical tape.
- Little chance of cutting too small a piece.
On the minus side of the ledger is how to shrink the tape. According to one set of instructions, you heat the free end and press it against the tape on the wires and then shrink as you do for tubing. I have seen adhesive versions of the tape and suspect they are free of this issue.
A couple of FAQs regarding heat shrink tape.
Q. Can I use electrical tape like heat shrink?
A. The short answer is, "No." Electrical tape isn't made of the same material, and as a result, it tends to burn rather than shrink. If shrinking is your intent, use the right product for the task.
Q. What colors of tape are available.
A. Say hello to the Henry Ford model, any color as long as it's black.
Do I need to add this to my Simple-Fixes tool kit?
Heat shrink tubing and tape are nice-to-have consumables. Can you get along without it in your Simple-Fixes tool kit? Absolutely. I started using it years ago when I was dabbling in electronics and have used it regularly since then.
Giving credit where credit is due
I'd like to thank a regular reader, Clark B. for giving me the idea to write about heat shrink tubing and tape. If you'd like to suggest something, please let me know at wccmn@outlook.com.