Kintsugi - the Japanese art of pottery repair
Repairing rather than trashing a broken household item is good stewardship and reflects the Japanese art of kintsugi. Read on to see how you can apply it at home.

Sure, the title sounds a bit esoteric, but you'll soon see why I included this in the blog. This is the practice of placing value on the wear and tear of an object. Here's what Wikipedia has to say about the practice:
Not only is there no attempt to hide the damage, but the repair is literally illuminated... a kind of physical expression of the spirit of mushin. Mushin is often literally translated as "no mind" but carries connotations of fully existing within the moment, of non-attachment, of equanimity amid changing conditions. ...The vicissitudes of existence over time, to which all humans are susceptible, could not be clearer than in the breaks, the knocks, and the shattering to which ceramic ware too is subject. This poignancy or aesthetic of existence has been known in Japan as mono no aware, a compassionate sensitivity, or perhaps identification with [things] outside oneself.
— Christy Bartlett, Flickwerk: The Aesthetics of Mended Japanese Ceramics
Where does kintsugi fit?
It has to do with repair. Rather than throw out an item, repair it and revel in the flaws that show. You can share the story behind them with others.
Drumroll, please - In 2020, I read a short article about this Japanese practice and was delighted to see my repair methods; though arrived at by a different path (see below), the results and the rationale matched.
A western version of kintsugi
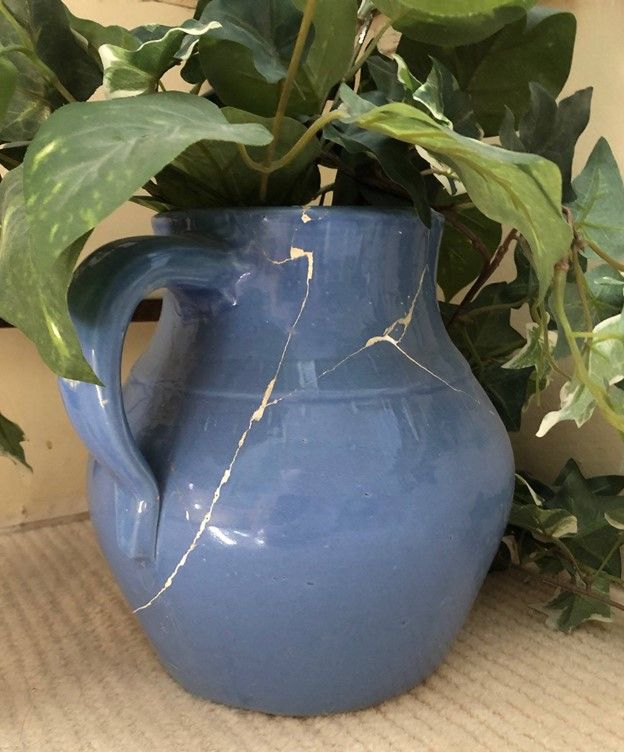
If your family is anything like mine, you have at least one fragile family heirloom. My folks enjoyed antiquing, and my childhood home was filled with all manner of things passed down from generation to generation.
Crockery and porcelain items were common, and I treasured each one for the meaning and memories it carried. Having moved many times in my adult life (I am in my 10th abode), things broke no matter how carefully packed. The first causality was a beautiful medium blue milk pitcher from the Shufflebarger side of the family. When we opened the box, my heart sank.
I carefully collected every piece and shard I could find and set them aside. The damage was extensive.
Grabbing my super glue, I started rebuilding the jug. It wasn't long before I found regluing shards was a hopeless and thankless task. When I had as many pieces reglued as my skills allowed, I had a milk jug with lots of visible cracks and some chunks missing here and there. It was not to my liking at all. So, it sat on the bench, awaiting the next steps.
While ruminating on how best to repair the jug, I happened to watch a program about archeology in the Mediterranean. There in museums were ancient vessels pieced back together. Where there were gaps, plain clay was used that matched the material used to fill cracks. The effect caught my fancy.
My version of archeological restoration used latex spackling to fill the cracks and gaps. Rather than color it to try and match the blue, I left it white. When done, I had my own archeological masterpiece! You can see the results below.

It doesn't hold milk or water but looks positively archeological.
Note: You can make the repair waterproof if you want. Simply spray the inside with a thick sealant like FlexSeal. If you plan to serve milk from it, you should coat the inside with a food-safe finish. After a bit of research, the only references I found were for wood finishes. Your best bet is to consult with your local paint store or kitchen supply place and get their recommendation.
Home Depot: food safe finishes overview
Step-by-step
Since this is a how-to rather than a philosophical or biographical history of my DIY journey, let's walk through a recent repair. We have an antique chamber pot from the Shufflebargers, that we keep in the bathroom to hold an extra roll of toilet paper. The DIY humor is deep and complex!
This piece suffered a broken lid recently, so I took the opportunity to document the steps in photographs. Digital photography is so much more convenient than my old darkroom ever was!
 Step 1: Collect and test-fit the pieces. |
 Step 2: Glue the first piece. The use of blue masking tape is to hold the part in place. |
 Step 3: Check the results of the glue-up. There are some minor cracks to fill. |
 Step 4: Smear more latex spackling into the cracks. Gently remove most with a paper towel while still moist. More techniques are below. |
 Step 5: After drying, you can see if any additional filling is needed or desired. |
Now, let's take a closer look at several techniques that will make your job easier.
Step 1: The urge is to start gluing right away. At least it is for me. If possible, put the pieces back together without glue. Use masking tape to hold them in place. Why? Pieces may go back together better if glued in a particular order. Many times, I have started gluing only to find that a bit doesn't fit well or won't go in at all without some "finessing."
Step 2: My preferred adhesive is some form of superglue, but not the instant stuff. I tend to go for the formulation that is a little thicker, and that doesn't set instantly. As a result, pieces do not bind right away and can shift. Masking tape can hold the piece in place for the few seconds needed to let the glue set.
- Tear off a piece of masking taping long enough to hold the piece properly.
- Stick it to the edge of your work surface for easy retrieval.
- Apply your glue and set it into position.
- After making sure you like the fit, hold the piece steady in one hand, and using the other hand, take the tape from the work surface edge and apply it to support the repair.
So why do I suggest sticking a piece of masking tape on the edge of your work surface? It's a pain to try and tear off a piece of tape with one hand. I haven't mastered it.
Step 3: No special tips here. If you are happy with your results, you are done! Time for another project.
Step 4: Latex spackling is the best choice in my experience because it dries fast and can be cleaned up with water. Lightweight spackling is an excellent choice for nearly any repair. Apply some spackling to the repair and work it into the cracks and gaps using your finger.
While the spackling is still moist, gently wipe off the excess with your finger, a paper towel or a rag. Too much pressure can remove more material than you want. Working with a wet rag can do the same thing.
Step 5: If your results aren't to your liking, put on a second coat. In the picture, I want to add a little more filling at point 1 and remove a little at point 2. Removal can be accomplished with a damp paper towel or a flexible piece of plastic like an old credit card.
And now it's your turn
This ranks up there with one of the easiest and most satisfying DIY projects. Instead of dumping the bits and chunks in the rubbish, apply the kintsugi method the next time a treasured heirloom or household item takes a beating. Your restored treasure will become a conversation starter by virtue of the repair. And you have repaired and possibly repurposed something rather than sending it to a landfill for future anthropologists to ponder over.